Pressure Canning Meatloaf (Shelf-Stable, Ready-to-Use Meals)
If you love having homemade meals ready on the shelf, pressure-canned meatloaf is a practical and satisfying option. It saves freezer space, reheats quickly, and can be turned into sandwiches, skillet meals, or classic meatloaf dinners in minutes.
Because this is a low-acid food (meat + eggs), it must be processed in a pressure canner only — never a water bath. Safety and correct processing are essential.
Important Safety Information
- Use a pressure canner, not a pressure cooker.
- Follow tested pressure and time recommendations.
- Adjust pressure for altitude if above 1,000 feet.
- Never guess on processing time.
- Do not alter ingredient ratios drastically.
- When in doubt, refrigerate and consume within 1–2 weeks.
Proper pressure canning prevents the growth of harmful bacteria such as botulism.
Ingredients (Makes about 7–9 Quart Jars)
- 10 lbs ground beef (80–85% lean recommended)
- 3 cloves garlic, finely minced
(Do not add extra — garlic flavor intensifies during canning.) - 1/2 onion, finely chopped
- 2–3 tablespoons light brown sugar
- 1¼ cups tomato ketchup
- 1 plastic sleeve of saltine crackers, crushed very fine
- 1 tablespoon dried parsley
- 1 teaspoon yellow mustard powder
- 1 teaspoon black pepper
- 2 teaspoons salt
- 8 large eggs
Equipment Needed
- Pressure canner with rack
- Mason jars (quart or pint)
- New lids and bands
- Jar lifter
- Canning funnel
- Clean damp cloth
- Bubble remover or plastic utensil
- Large mixing bowl
Step-by-Step Instructions
Step 1: Prepare Your Jars
- Wash jars in hot, soapy water and rinse well.
- Keep jars hot until ready to fill (in hot water or warm dishwasher cycle).
- Place lids in hot (not boiling) water to soften sealing compound.
- Inspect rims carefully for cracks or chips.
Keeping jars warm prevents thermal shock when placing them into the canner.
Step 2: Prepare the Meatloaf Mixture
In a very large bowl:
- Add ground beef.
- Add minced garlic, chopped onion, brown sugar, ketchup, crushed crackers, parsley, mustard powder, pepper, salt, and eggs.
- Mix thoroughly by hand until evenly combined.
Avoid overmixing too aggressively, but ensure ingredients are fully incorporated.
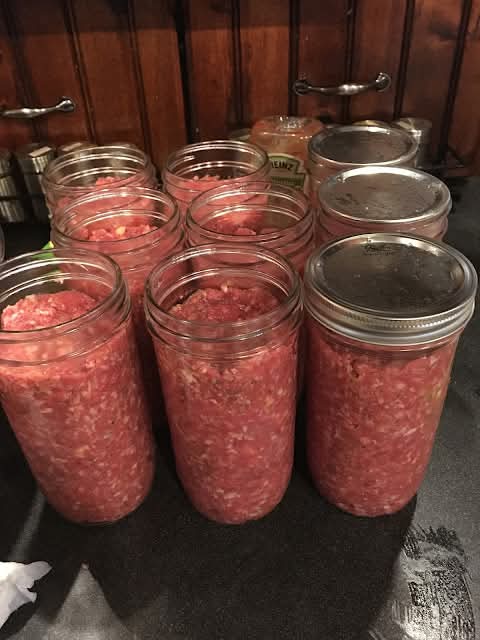
Step 3: Fill the Jars
- Place a canning funnel over each hot jar.
- Add meat mixture in small portions.
- Pack tightly after each addition to remove air pockets.
- Leave 1¼ inches headspace at the top.
Headspace is extremely important for proper sealing and expansion during processing.
Use a plastic utensil or tool to remove trapped air bubbles.
Step 4: Clean and Seal
- Wipe rims carefully with a clean damp cloth.
- Make sure no grease or meat remains on the rim.
- Place lids on jars.
- Screw bands on finger-tight only.
Do not overtighten. Air must escape during processing to create a vacuum seal.
Step 5: Load the Pressure Canner
- Add 2–3 inches of water (or as directed by your manufacturer).
- Place jars on rack inside canner.
- Lock lid in place.
- Leave the weight off initially.
Step 6: Vent the Canner
- Turn heat to high.
- Once a steady stream of steam escapes from the vent, begin timing 10 minutes.
- This removes trapped air and ensures even internal temperature.
After 10 minutes of steady venting:
- Place the weight on the vent pipe.
Step 7: Bring to Pressure
Allow pressure to reach:
- 10 PSI (dial gauge)
OR - Follow manufacturer instructions for weighted gauge models.
Once at correct pressure:
- Reduce heat slightly to maintain steady pressure.
- If pressure drops below target, you must restart processing time.
Step 8: Processing Time
- Quart jars: 90 minutes
- Pint jars: 75 minutes
Maintain steady pressure the entire time.
Step 9: Natural Cool Down
When processing time is complete:
- Turn off heat.
- Do NOT remove the weight.
- Allow pressure to drop naturally to zero.
- Wait 10 additional minutes.
- Remove weight carefully.
- Open lid away from your face.
Do not force cool the canner. Rapid cooling can cause seal failure or unsafe processing.
Step 10: Rest and Seal Check
- Remove jars carefully using jar lifter.
- Place on towel.
- Let sit undisturbed for 12–24 hours.
- You should hear lids “ping” as they seal.
After 24 hours:
- Remove bands.
- Press center of lid — it should not flex.
- Lift jar gently by lid — it should stay attached.
- Lid should appear slightly concave.
If any jar did not seal:
- Refrigerate immediately.
- Use within 1–2 weeks.
Storage
- Store in a cool, dark place.
- Label jars with date.
- Best quality within 1 year.
How to Use Canned Meatloaf
Because it is packed tightly, juices and fat may solidify inside the jar.
To remove easily:
- Warm jar slightly in hot water
OR - Microwave briefly after removing lid
Serving ideas:
- Slice and pan-fry until browned
- Glaze with ketchup or BBQ sauce
- Make meatloaf sandwiches
- Crumble into pasta sauce
- Serve with mashed potatoes and vegetables
Helpful Tips
- Use 80–85% lean beef for best texture.
- Crush crackers very fine to avoid air pockets.
- Do not add extra fillers beyond tested proportions.
- Adjust pressure for altitude if necessary.
- Always inspect jars before opening.
Pressure-canned meatloaf is a practical way to preserve protein safely while having a homemade meal ready anytime. When done correctly, it creates a convenient, shelf-stable product that can save time during busy weeks.