Mozzarella Stick Onion Rings
The Ultimate Crispy, Cheesy Appetizer You’ll Ever Make
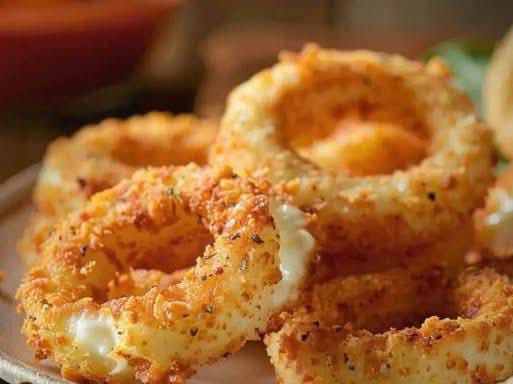
If you’ve ever had trouble choosing between mozzarella sticks and onion rings, this recipe solves that problem in the most delicious way possible. Mozzarella Stick Onion Rings combine two of the most loved comfort foods into one irresistible bite: crispy golden onion rings stuffed with gooey, stretchy melted mozzarella cheese.
Perfect for parties, game days, family gatherings, or even a weekend indulgence, this recipe delivers a satisfying crunch on the outside and a rich, cheesy center on the inside. Once you try them, they may become your new favorite homemade appetizer.
Let’s dive into how to make these crispy mozzarella stuffed onion rings step by step.
Why You’ll Love These Mozzarella Stick Onion Rings
- Extra crispy coating
- Gooey melted mozzarella center
- Crowd-pleasing party snack
- Easy to prepare ahead of time
- Perfect for dipping in marinara sauce
This recipe combines texture, flavor, and visual appeal — especially when you pull one apart and see that perfect cheese stretch.
Ingredients
To make these crispy mozzarella onion rings, you will need:
- 2 large white onions
- 3 slices mozzarella cheese (cut into strips)
- 2 cups all-purpose flour (250 g)
- 5 large eggs, beaten
- 2 cups breadcrumbs (230 g)
- Oil for frying (vegetable oil or canola oil recommended)
- Marinara sauce for dipping
Optional Seasonings (Highly Recommended)
- 1 teaspoon garlic powder
- 1 teaspoon paprika
- ½ teaspoon salt
- ½ teaspoon black pepper
- ½ teaspoon Italian seasoning
Adding seasoning enhances the flavor and makes them taste restaurant-quality.
Step-by-Step Instructions
Step 1: Prepare the Onions
Start by peeling the onions and slicing them into ½-inch (1 cm) thick rings. Try to keep the slices even so they cook uniformly.
Carefully separate the rings and match smaller rings with larger ones, placing the smaller ring inside the larger one. Leave a gap between them — this space will hold the mozzarella.
Step 2: Add the Mozzarella Filling
Cut the mozzarella slices into even strips.
Gently press the mozzarella strips into the gap between the inner and outer onion rings. Make sure the cheese fills the entire space evenly.
For extra cheesiness, you can add a second layer of mozzarella.
Place all assembled rings on a parchment-lined tray and freeze them for at least 1 hour. Freezing is extremely important because it prevents the cheese from melting too quickly during frying.
Step 3: Prepare the Breading Station
Set up three separate bowls:
- Bowl 1 – Flour (mix with salt, pepper, and spices if using)
- Bowl 2 – Beaten eggs
- Bowl 3 – Breadcrumbs
For extra crunch, you can use panko breadcrumbs instead of regular breadcrumbs.
Step 4: Coat the Onion Rings
Take the frozen onion rings and coat them in this order:
- Dip in flour (shake off excess)
- Dip in beaten eggs
- Coat in breadcrumbs
For extra crispiness and better cheese sealing, repeat the egg and breadcrumb steps one more time. This double coating creates a thicker crust that keeps the cheese from leaking out.
After coating, place the rings back in the freezer for another 30–60 minutes. This second freeze helps ensure perfect frying results.
Step 5: Fry to Golden Perfection
Heat oil in a deep pot to 350°F (175°C). Maintaining the correct temperature is key — too hot and the coating burns, too cool and they absorb too much oil.
Carefully lower a few rings into the hot oil. Do not overcrowd the pot.
Fry for about 2–3 minutes, or until golden brown and crispy.
Remove with a slotted spoon and place on paper towels to drain excess oil.
Serve immediately while hot for the best cheese pull effect.
Baking and Air Fryer Options
If you prefer a healthier alternative, you can bake or air fry them.
Baking Instructions:
- Preheat oven to 400°F (200°C)
- Place coated rings on a lined baking sheet
- Spray lightly with cooking oil
- Bake for 18–22 minutes, flipping halfway
Air Fryer Instructions:
- Preheat air fryer to 375°F (190°C)
- Arrange rings in a single layer
- Cook for 8–10 minutes until golden
Keep in mind that deep frying produces the crispiest results.
Tips for Perfect Mozzarella Stick Onion Rings
- Always freeze before frying to prevent cheese leaks.
- Use low-moisture mozzarella for best results.
- Double coat for extra crunch and better sealing.
- Keep oil temperature steady at 350°F.
- Serve immediately for maximum cheesiness.
Best Dipping Sauces
While marinara sauce is classic, you can also serve these with:
- Ranch dressing
- Garlic aioli
- Spicy sriracha mayo
- Honey mustard
- Barbecue sauce
Offering multiple dips makes them perfect for parties.
Storage and Make-Ahead Tips
You can prepare these in advance.
To freeze before frying:
- Assemble and coat the rings
- Freeze on a tray until solid
- Store in an airtight freezer bag for up to 2 months
Fry directly from frozen — just add 30–60 seconds to cooking time.
For leftovers:
- Store in refrigerator for up to 3 days
- Reheat in oven or air fryer for best texture
- Avoid microwaving, as it makes them soggy
Nutritional Overview (Approximate)
Per serving (varies by size and frying method):
- Calories: 320–400
- Protein: 12–15 g
- Carbohydrates: 30–35 g
- Fat: 18–22 g
Baked or air-fried versions will have fewer calories and less fat.
Why This Recipe Is Perfect for Entertaining
Mozzarella Stick Onion Rings are:
- Visually impressive
- Easy finger food
- Fun to share
- Kid-friendly
- Great for game nights
They combine familiarity with creativity — everyone loves onion rings and mozzarella sticks, so this hybrid appetizer feels exciting yet comforting.
Final Thoughts
Mozzarella Stick Onion Rings are the ultimate comfort food fusion. With their crispy golden coating and gooey melted center, they deliver everything you love about classic appetizers in one bite.
Whether you’re hosting a party, planning a movie night, or simply craving something indulgent, this recipe guarantees satisfaction.
Make them once, and they’ll quickly become a repeat favorite in your kitchen.