
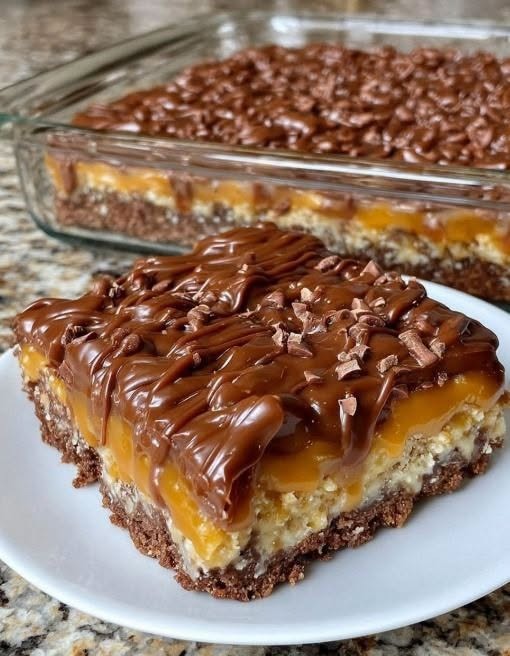
Chocolate Caramel Pretzel Bars
If you’re looking for the perfect dessert that combines sweet, salty, crunchy, and chocolatey flavors, these Chocolate Caramel Pretzel Bars are guaranteed to become a family favorite. They feature a buttery pretzel crust, a rich homemade caramel layer, and a smooth chocolate topping finished with extra pretzels and flaky sea salt. Every bite delivers the perfect balance of textures and flavors, making these bars ideal for holidays, birthdays, potlucks, bake sales, or simply satisfying your sweet tooth.
The best part? They’re surprisingly easy to make with simple pantry ingredients, and they can be prepared ahead of time, making them perfect for entertaining. Whether you’re an experienced baker or trying homemade dessert bars for the first time, this recipe is simple enough for anyone to master.
Recipe Information
Prep Time: 20 minutes
Cook Time: 15 minutes
Chill Time: 2 hours
Total Time: 2 hours 35 minutes
Servings: 16 bars
Difficulty: Easy
Ingredients
For the Pretzel Crust
- 2½ cups crushed salted pretzels
- ¾ cup (170g) unsalted butter, melted
- 3 tablespoons light brown sugar
For the Homemade Caramel
- 1 cup (225g) unsalted butter
- 1 cup packed brown sugar
- ½ cup heavy cream
- 1 teaspoon vanilla extract
- ½ teaspoon sea salt
For the Chocolate Layer
- 10 ounces (280g) milk chocolate, chopped
- 2 ounces (60g) dark chocolate, chopped
- 1 tablespoon coconut oil or vegetable oil (optional)
Optional Toppings
- Mini pretzels
- Flaky sea salt
- Caramel drizzle
- Chopped pecans
- Chopped peanuts
- Chocolate chips
Equipment Needed
- 8×8-inch baking pan
- Parchment paper
- Medium saucepan
- Mixing bowl
- Rubber spatula
- Offset spatula or spoon
- Microwave-safe bowl
Instructions
Step 1: Prepare the Pan
Line an 8×8-inch baking pan with parchment paper, leaving extra paper hanging over the sides. This will make removing the bars much easier after they have chilled.
Preheat your oven to 350°F (175°C).
Step 2: Make the Pretzel Crust
Place the pretzels in a food processor and pulse until they become coarse crumbs. Avoid grinding them into a fine powder—the small pieces provide extra crunch and texture.
In a medium bowl, combine the crushed pretzels, melted butter, and brown sugar. Stir until every crumb is evenly coated.
Transfer the mixture to the prepared pan and firmly press it into an even layer using the bottom of a measuring cup or glass.
Bake for 10 minutes, then remove from the oven and allow the crust to cool slightly.
Step 3: Prepare the Caramel
In a medium saucepan over medium heat, melt the butter.
Add the brown sugar and stir continuously until the sugar dissolves completely.
Slowly pour in the heavy cream while whisking.
Bring the mixture to a gentle boil and cook for about 4–5 minutes, stirring constantly until the caramel thickens.
Remove from the heat and stir in the vanilla extract and sea salt.
Carefully pour the warm caramel over the baked pretzel crust, spreading it into an even layer.
Place the pan in the refrigerator for about 30 minutes until the caramel begins to set.
Step 4: Melt the Chocolate
Combine the milk chocolate and dark chocolate in a microwave-safe bowl.
Heat in 20-second intervals, stirring after each interval until smooth.
If desired, stir in the coconut oil to create an extra glossy finish.
Spread the melted chocolate evenly over the chilled caramel layer.
Step 5: Decorate
Before the chocolate sets completely, decorate the top with:
- Pretzel pieces
- Flaky sea salt
- Caramel drizzle
- Chopped nuts
- Chocolate chips
Press the toppings gently into the chocolate.
Step 6: Chill
Refrigerate the bars for at least 2 hours, or until the chocolate has completely hardened.
Lift the dessert from the pan using the parchment paper and cut into squares with a sharp knife.
For cleaner slices, run the knife under hot water, dry it thoroughly, and wipe it clean between each cut.
Expert Tips
- Use good-quality chocolate for the richest flavor.
- Don’t overcook the caramel, or it may become too firm after chilling.
- Press the crust firmly to prevent it from crumbling.
- Chill completely before slicing.
- Sprinkle flaky sea salt over the chocolate to enhance both the caramel and chocolate flavors.
- Store the bars in the refrigerator if your kitchen is warm.
Variations
Peanut Butter Version
Spread a thin layer of peanut butter over the caramel before adding the chocolate.
Dark Chocolate Lovers
Replace all the milk chocolate with dark chocolate for a richer, less sweet dessert.
Nutty Caramel Bars
Add chopped pecans, walnuts, or peanuts between the caramel and chocolate layers.
Holiday Version
Decorate with festive sprinkles or crushed candy canes during the holiday season.
Extra Crunch
Mix toffee bits into the caramel layer for even more texture.
Storage Instructions
Store the bars in an airtight container in the refrigerator for up to 7 days.
For longer storage, freeze them for up to 2 months. Separate each layer with parchment paper to prevent sticking.
Allow frozen bars to thaw in the refrigerator before serving.
Nutrition Information (Approximate Per Serving)
- Calories: 320
- Carbohydrates: 35g
- Protein: 3g
- Fat: 19g
- Saturated Fat: 11g
- Sugar: 24g
- Fiber: 2g
- Sodium: 180mg
Frequently Asked Questions
Can I use store-bought caramel?
Yes. Homemade caramel provides a richer flavor and smoother texture, but high-quality store-bought caramel sauce can save time.
Can I use unsalted pretzels?
Yes, but salted pretzels create the signature sweet-and-salty flavor that makes these bars so delicious.
Why did my chocolate crack when I cut the bars?
Let the bars sit at room temperature for 10–15 minutes before slicing. Using a warm knife also helps create clean cuts.
Can I make these ahead of time?
Absolutely! These bars are an excellent make-ahead dessert because they taste even better after chilling overnight.
Can I freeze them?
Yes. Wrap the bars tightly and freeze for up to two months. Thaw overnight in the refrigerator before serving.
Final Thoughts
These Chocolate Caramel Pretzel Bars are the ultimate combination of crunchy pretzels, buttery homemade caramel, and silky chocolate. They’re easy to prepare, require simple ingredients, and always impress guests with their beautiful layered appearance and irresistible flavor. Whether you’re baking for a celebration, preparing treats for the holidays, or simply craving an indulgent homemade dessert, this recipe delivers bakery-quality results every time. One bite is all it takes to understand why these sweet and salty dessert bars are such a popular favorite.