Chocolate Coconut Bars
When it comes to satisfying dessert cravings while still keeping things lighter and lower in carbs, few treats are as delicious and rewarding as homemade Chocolate Coconut Bars. These bars combine the rich intensity of smooth dark chocolate with the naturally sweet, chewy texture of coconut to create a dessert that feels indulgent, comforting, and incredibly satisfying without relying on excessive sugar or complicated ingredients.
Perfect for anyone following a low carb lifestyle, keto-inspired eating plan, gluten-free diet, or simply trying to make healthier dessert choices, these bars deliver everything people love about classic chocolate candy bars while giving you more control over ingredients and sweetness levels.
One of the reasons this recipe has become so popular is because it strikes the perfect balance between:
- simplicity
- flavor
- texture
- nutrition
- convenience
Unlike many traditional desserts that require baking, multiple mixing bowls, and long ingredient lists, these Chocolate Coconut Bars come together with minimal effort and only a few pantry-friendly ingredients. Despite their simplicity, they taste rich, luxurious, and bakery-quality.
The coconut layer is soft, chewy, and naturally flavorful, while the chocolate topping creates a silky, decadent finish that melts beautifully with every bite. Together, the textures create a dessert experience that feels both comforting and elegant at the same time.
Whether you enjoy them as:
- an afternoon snack
- a healthy dessert
- a meal-prep sweet treat
- a coffee companion
- a post-dinner indulgence
- or a quick energy bite
these Chocolate Coconut Bars are guaranteed to become one of your favorite homemade desserts.
Preparation Time
- Prep Time: 15–20 minutes
- Chill Time: 1–2 hours
- Total Time: Approximately 2 hours
- Yield
Makes around 12 bars or 16 small squares depending on size.
Ingredients
Coconut Layer
- 2½ cups unsweetened shredded coconut
- 1/3 cup low carb sweetener (erythritol, monk fruit, or preferred sweetener)
- 1/3 cup melted coconut oil or melted butter
- 1 teaspoon vanilla extract
- Pinch of salt
Chocolate Layer
- 1½ cups sugar-free dark chocolate chips or chopped dark chocolate
- 1 tablespoon coconut oil
Optional Additions
- Chopped almonds
- Chopped walnuts
- Peanut butter
- Almond butter
- Sea salt flakes
- Cinnamon
- Cocoa nibs
These optional ingredients can completely transform the flavor profile and texture of the bars while keeping them low carb and satisfying.
Step-by-Step Instructions
Step 1: Prepare the Pan
Begin by lining a square baking dish, loaf pan, or small casserole dish with parchment paper.
Leave extra parchment hanging over the edges to make lifting the bars out easier later.
This step is important because the chocolate layer can stick if the pan is not properly prepared.
A lined pan also helps create cleaner edges and easier slicing once the bars are chilled.
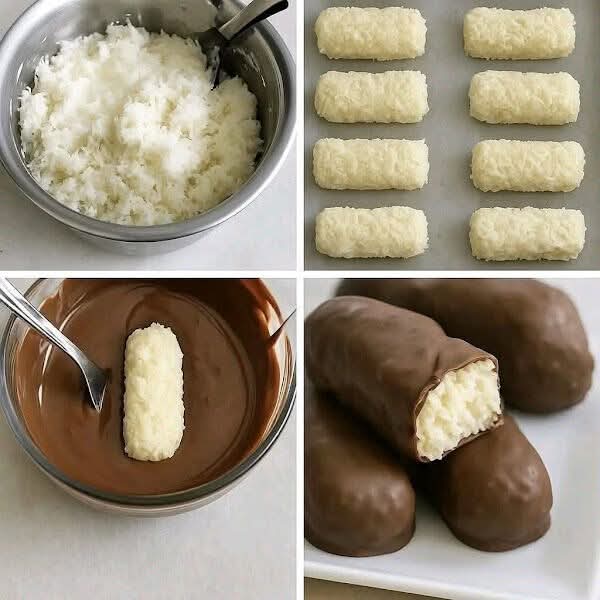
Step 2: Create the Coconut Mixture
In a large mixing bowl, combine:
- shredded coconut
- sweetener
- vanilla extract
- pinch of salt
Mix thoroughly until evenly distributed.
Next, pour in the melted coconut oil or butter.
Stir carefully until the coconut becomes evenly coated and slightly sticky.
The mixture should hold together when squeezed between your fingers.
If the texture feels too dry or crumbly, add a small extra amount of coconut oil one teaspoon at a time.
The goal is to create a moist coconut mixture that presses together easily without becoming greasy.
Step 3: Form the Coconut Base
Transfer the coconut mixture into the prepared baking dish.
Using the back of a spoon, silicone spatula, or your hands, firmly press the mixture down into an even compact layer.
This is one of the most important parts of the recipe because tightly pressing the base helps the bars maintain their shape after slicing.
Take your time smoothing the surface evenly from corner to corner.
A compact base creates:
- cleaner slices
- sturdier bars
- better texture
- more professional presentation
Step 4: Melt the Chocolate
Place the chocolate and coconut oil into a heat-safe bowl.
There are two common melting methods:
Microwave Method
Heat in short 20-second intervals, stirring after each interval until completely smooth.
Double Boiler Method
Place the bowl over gently simmering water and stir continuously until melted.
Avoid overheating the chocolate because excessive heat can cause it to become thick, grainy, or dull.
The coconut oil helps create:
- a shinier finish
- smoother consistency
- softer bite after chilling
The melted chocolate should be silky, glossy, and easy to spread.
Step 5: Add the Chocolate Layer
Pour the melted chocolate over the coconut base.
Using a spatula or spoon, spread the chocolate evenly across the top.
Make sure every corner is fully covered.
At this stage, you can also sprinkle optional toppings such as:
- chopped almonds
- sea salt flakes
- toasted coconut
- crushed walnuts
- cocoa nibs
These toppings add texture, flavor, and visual appeal.
A small sprinkle of sea salt especially helps balance the sweetness and enhances the richness of the chocolate.
Step 6: Chill the Bars
Place the pan in the refrigerator for at least 1–2 hours.
During chilling:
- the coconut layer firms up
- the chocolate hardens
- the flavors develop further
If you are in a hurry, you can freeze the bars for about 30–40 minutes instead.
However, slower refrigeration often gives the best final texture.
The bars should feel completely firm before slicing.
Step 7: Slice and Serve
Once chilled, lift the bars out of the pan using the parchment paper.
Transfer to a cutting board and slice into:
- squares
- rectangles
- mini bites
- snack bars
For cleaner cuts:
- use a sharp knife
- wipe the knife between cuts
- slightly warm the blade if needed
You’ll end up with glossy chocolate-topped bars featuring a chewy coconut center and a rich chocolate finish.
Every bite delivers a satisfying contrast between creamy chocolate and textured coconut.
Why These Chocolate Coconut Bars Are So Popular
These bars have become a favorite homemade dessert because they offer:
- rich chocolate flavor
- satisfying texture
- low carb ingredients
- easy preparation
- no baking required
- customizable flavors
- meal-prep convenience
Unlike many packaged low carb snacks, homemade bars allow you to fully control:
- sweetness levels
- ingredient quality
- carbohydrate content
- portion size
That makes them both healthier and more personalized.
Flavor Variations
Almond Chocolate Coconut Bars
Add chopped almonds between the coconut and chocolate layers for a candy-bar-inspired version.
Peanut Butter Coconut Bars
Spread a thin layer of natural peanut butter before adding chocolate.
Mocha Coconut Bars
Mix espresso powder into the melted chocolate.
Extra Chocolate Version
Add cocoa powder directly into the coconut layer.
Crunchy Nut Version
Mix crushed walnuts, pecans, or hazelnuts into the coconut base.
Salted Dark Chocolate Bars
Sprinkle flaky sea salt on top before chilling.
Tips for the Best Results
Use High-Quality Chocolate
The chocolate layer is the star of the dessert, so quality makes a huge difference.
Good dark chocolate creates deeper flavor and smoother texture.
Press the Base Firmly
A loose coconut layer may crumble after slicing.
Compact pressing creates cleaner bars.
Chill Fully Before Cutting
Warm chocolate can crack or smear.
Cold bars slice much more neatly.
Store Cold
Coconut oil softens at room temperature.
Keeping the bars refrigerated maintains the best texture.
Customize Sweetness
Different sweeteners vary in intensity, so taste the coconut mixture before pressing it into the pan.
Storage Instructions
Refrigerator
Store in an airtight container for up to 1 week.
Freezer
Freeze for up to 2 months.
Place parchment paper between layers to prevent sticking.
Serving Suggestions
These Chocolate Coconut Bars pair beautifully with:
- coffee
- cappuccino
- espresso
- hot tea
- almond milk
- protein shakes
They also work wonderfully as:
- lunchbox snacks
- post-workout treats
- holiday desserts
- meal-prep sweets
- late-night cravings
Estimated Nutrition Information
Approximate values per serving:
- Calories: 180–250
- Net Carbs: Low
- Protein: Moderate
- Healthy Fats: High
- Sugar: Very low
Exact nutrition depends on the ingredients and chocolate used.
Final Thoughts
These Chocolate Coconut Bars prove that healthier desserts do not need to feel restrictive or boring.
With their rich chocolate topping, chewy coconut center, naturally satisfying texture, and customizable flavors, they offer the perfect balance between indulgence and mindful eating.
They are simple enough for beginner cooks, convenient enough for meal prep, and delicious enough to impress guests or satisfy serious dessert cravings.
Whether you are following a low carb lifestyle or simply searching for a healthier homemade sweet treat, these bars are a recipe worth keeping in your kitchen for years to come.