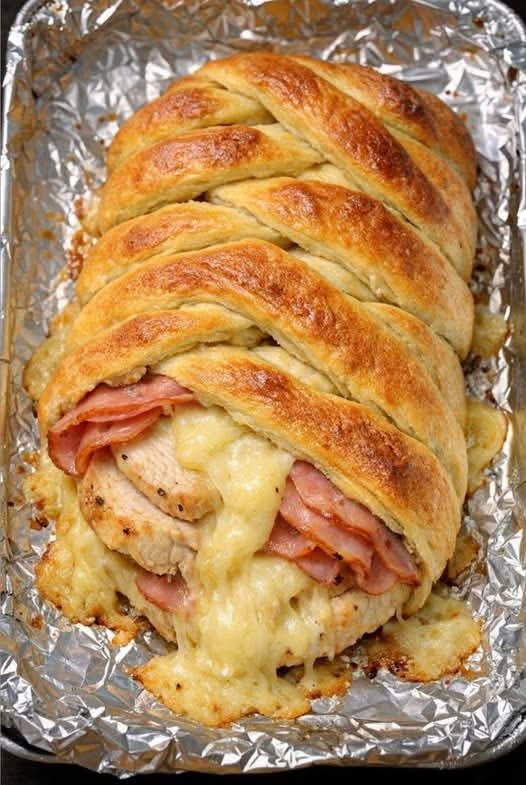
Chicken Cordon Bleu Crescent Braid
If you love comfort food that looks impressive but is surprisingly easy to make, Chicken Cordon Bleu Crescent Braid is a perfect recipe to try. This dish is inspired by the classic Chicken Cordon Bleu, a well-known meal traditionally made with chicken stuffed with ham and cheese, breaded, and baked or fried. In this version, the flavors are wrapped inside soft crescent roll dough and braided into a beautiful golden crust.
The result is a warm, flaky, and cheesy dish that is perfect for family dinners, casual gatherings, potlucks, or even a weekend lunch. The creamy chicken filling combined with savory ham and melted cheese creates a delicious balance of flavors, while the crescent dough bakes into a buttery and slightly crispy crust. Even though it looks fancy when served, it’s actually very simple to prepare.
This recipe is especially popular because it uses convenient ingredients and requires minimal cooking skills. If you have leftover cooked chicken in your fridge, this is also a great way to transform it into something new and exciting.
Ingredients
For the Filling
- 2 cups cooked chicken, shredded or diced
- 1 cup Swiss cheese, shredded or thinly sliced
- ½ cup cooked ham, chopped into small pieces
- ⅓ cup mayonnaise
- 1 tablespoon Dijon mustard (optional but recommended for flavor)
- ½ teaspoon garlic powder
- ½ teaspoon onion powder
- ¼ teaspoon black pepper
- Salt to taste
For the Crescent Braid
- 2 cans refrigerated crescent roll dough
For the Topping
- 1 egg, beaten
- 1 tablespoon chopped fresh parsley (optional)
- 2 tablespoons grated Parmesan cheese (optional)
Preparation Time
- Prep Time: 15–20 minutes
- Cooking Time: 20–25 minutes
- Total Time: About 40–45 minutes
- Servings: 4–6 people
Step-by-Step Instructions
1. Preheat the Oven
Start by preheating your oven to 375°F (190°C). Line a large baking sheet with parchment paper so the crescent dough doesn’t stick while baking.
2. Prepare the Chicken Filling
In a medium mixing bowl, combine the shredded chicken, chopped ham, and Swiss cheese. Add the mayonnaise and Dijon mustard, then sprinkle in the garlic powder, onion powder, black pepper, and a small pinch of salt.
Mix everything together thoroughly until the ingredients are evenly coated and the mixture becomes creamy. The mayonnaise helps bind the filling together while also keeping the chicken moist during baking.
3. Arrange the Crescent Dough
Open the cans of crescent roll dough and carefully separate the triangles. On the prepared baking sheet, arrange the dough pieces in the center so they form a long rectangle.
Press the seams together slightly so the dough forms one solid base. The triangles should overlap a little in the center, while the pointed ends extend outward on both sides. These outer strips will later be used to create the braided look.
4. Add the Filling
Spoon the chicken mixture evenly down the center of the dough rectangle. Make sure to leave the side strips uncovered because they will be folded over the filling later.
Spread the filling into a long, even strip so every slice of the braid contains the same amount of chicken and cheese.
5. Create the Braid Shape
Using a knife or kitchen scissors, cut the outer edges of the dough into strips about 1 to 1½ inches wide. You should have matching strips on both sides of the filling.
Starting at one end, fold one strip over the filling, then fold the strip from the opposite side across it. Continue alternating left and right strips until the entire braid is covered. This creates a beautiful woven pattern that looks elegant once baked.
When you reach the end, tuck the final pieces of dough underneath slightly to seal the braid.
6. Add the Topping
Brush the top of the braid with the beaten egg. This step helps the crust become shiny and golden brown during baking.
If you like, sprinkle Parmesan cheese and chopped parsley over the top for extra flavor and presentation.
7. Bake the Crescent Braid
Place the baking sheet in the preheated oven and bake for 20–25 minutes, or until the dough is fully cooked and turns a deep golden color.
The cheese inside should be melted and bubbly, and the crescent crust should feel firm and slightly crisp on the outside.
8. Let It Rest and Serve
Remove the braid from the oven and allow it to cool for about 5 minutes before slicing. This helps the filling set slightly so the slices hold their shape.
Use a sharp knife to cut the braid into thick slices and serve warm.
Serving Suggestions
Chicken Cordon Bleu Crescent Braid pairs well with many simple side dishes, such as:
- Fresh green salad
- Roasted vegetables
- Garlic potatoes
- Steamed broccoli
- Creamy mustard sauce
It’s also great served as a party appetizer if you slice it into smaller portions.
Tips for the Best Results
- Use rotisserie chicken: It saves time and adds extra flavor.
- Don’t overfill the braid: Too much filling can make the dough difficult to close.
- Seal the seams well: Pressing the dough slightly prevents the filling from leaking during baking.
- Experiment with cheese: Mozzarella, cheddar, or provolone also work well if Swiss cheese isn’t available.
Variations
One of the best things about this recipe is how easy it is to customize.
Broccoli Chicken Braid:
Add ½ cup of finely chopped steamed broccoli to the filling for extra nutrition.
Spicy Version:
Mix a little hot sauce or chili flakes into the filling for a spicier flavor.
Turkey Cordon Bleu Braid:
Replace the ham with smoked turkey for a lighter variation.
Final Thoughts
Chicken Cordon Bleu Crescent Braid is a delicious combination of creamy chicken filling, savory ham, and melted cheese wrapped in soft and flaky crescent dough. The braided presentation makes the dish look elegant and impressive, yet the recipe remains simple enough for beginner cooks.
Whether you’re preparing dinner for your family or bringing a dish to a gathering, this recipe is guaranteed to be a crowd-pleaser. The comforting flavors, golden crust, and cheesy interior make it a meal that everyone will want to enjoy again and again.